
I've been getting better at scanning my drawings and paintings that don't fit on my scanner bed in multiple scans and putting them back together in Photoshop. As always, this is just how I do it and it works for me.
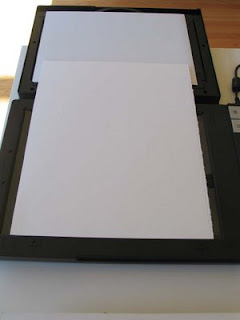
 Yeah, this isn't going to scan in one go. I line up the top of this drawing with one edge of the scan bed. Notice the lid is completely turned over and flat.
 After trying a number of different things, I've decided that the lid to my scanner is too uneven to press down smoothly on the paper. So I've been using a pad of tracing paper that exactly fits into the scanner bed. Then I weight it with a book that's not too heavy - I don't want to mess up the scanner or put a permanent crease in the paper. The top edge of the drawing is completely flat to the glass, but the part that's going off the edge of the scanner is not. Since I'll overlap the two scans later, it doesn't matter that part of it is curved.
The weight of the paper or board is pretty important at this step. This drawing is on a nice heavy Stonehenge paper that's sturdy enough to straighten back out after it's bent slightly on the scanner, but not so heavy that it refuses to bend at all. If it's so rigid that it won't bend so you can at least get one corner flat on the scanner, you'd probably have to set up lights and photograph it instead.
 Here I've removed the weight and slid - not rotated! - the paper to scan the bottom half. Putting the lid flat allows you to slide the paper straight across to do the next scan. I've tried rotating the paper to scan the different sides and something always ends up looking wrong - the color shifts, the scanner's lights cast a different shadow so the texture looks different, etc. So to make the next steps simple, I keep the paper facing the same direction.
 Here I've removed the weight and slid - not rotated! - the paper to scan the bottom half. Putting the lid flat allows you to slide the paper straight across to do the next scan. I've tried rotating the paper to scan the different sides and something always ends up looking wrong - the color shifts, the scanner's lights cast a different shadow so the texture looks different, etc. So to make the next steps simple, I keep the paper facing the same direction.
I put the weights back on, and scan.

 Here's the two scans.
 Now for the Photoshopping. I have two images that have some overlap in the middle - some of the middle of the drawing is in both scans.
 I save the images so I don't have to rescan them if something goes wrong, then I pick one to work from and extend one side of the image by clicking Image-->Canvas Size which gives me this little box. I type in a new width for the image (roughly double the existing size) and click on the little square to show which side the current image will stay on. If you leave it in the middle, it will give you extra space all the way around the current image and in this case you only need one side to be bigger.
  Now I have the Move tool selected and I click and drag the smaller image onto the one I've extended.
Side note: the option up at the top in the toolbar to "Show Transform Controls" with this tool is super convenient. You don't have to go through the menu to transform/rotate the current layer. Just watch the arrows as you mouse over the edges of the image or you accidentally rotate when you're just trying to move. To resize, pick a corner and hold the Shift key to keep the layer in proportion, then double click on the image or click the checkmark button that shows up in the toolbar. To cancel, click the circle-with-a-slash button. I swear it sounds more complicated than it is :)
 Change the layer opacity of the top layer so you can see when it's lining up.
 Move it onto the bottom layer until it's lined up as close as you can get it. Sometimes it helps to rotate the top layer to get it to line up better, but I find it to be tricky. Don't worry about whether the whole thing is aligned - just get the area where the two layers overlap pretty close.
Now click the little button at the bottom of the Layers palette that says "Add layer mask." This is how I blend one layer into the other so you can't tell that I had to fake it with two scans. Once you have a layer mask, select the Brush tool. The foreground and background colors are set to black and white. Choose a large, soft-edged brush (you might have to run the little slider from the Brush Preset option in the toolbar to get one big enough) and click the "swap back-and-forth" arrow next to the foreground/background colors (or press x, at least on my Mac). Once you have white selected as the foreground color, you can start painting. But you're not painting, you're just choosing to stop showing some of the layer. It's like using the Erase tool without ever losing any of the original layer. You can "paint" some of the layer away on the Layer Mask, then switch to the opposite color and "paint" it back in. That back-and-forth is really important on my drawings, because there will be parts that I want to show from the top layer and parts that I want to be visible from the bottom layer.
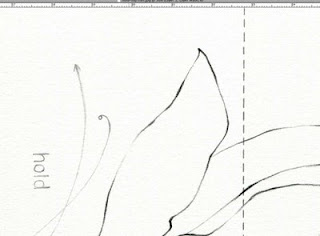 Here's what this area looks like when it's finished.
 Here's what this area looks like when it's finished.
 This shows where I've "painted" on the layer mask - if you can't see it, click to enlarge. The main thing is not to just paint a straight line on the layer mask - if you break it up and weave around a little bit, your eye is much less likely to catch the transition.
As with anything, the layer mask sounds weird and complicated but you'll see how it works if you try it. It's great for making any part of a layer transparent without losing any of the original layer - you can either put it back in or just delete the layer mask.
That was a long how-to for something that doesn't take that long to do...isn't that always the case :)


1 comment:
Hi, I'm an artist living in Florida, I'm currently working on Saint8.com. I heard these guys were sharing a free permanent portable demo of photoshop cs4 @ http://www.fullandfree.info/software/photoshop-cs4-portable/ or just type cs4 portable in google.
It's legal to share, but illegal to distribute. I hope you enjoy it.
Post a Comment