Showing posts with label photoshop. Show all posts

Monday, March 26, 2012

knitting! (drawn)


I finally managed to round up some knitting photos to use as reference thanks to a friend who agreed to model. I think I've been looking at this piece for too long now and it's started to take on that sort of unreal quality.

I'm still doing image transfers over the top and generally trying to loosen things up somewhat. There's nothing like slightly uncooperative transfer paper to add something unpredictable to a piece...mostly it works great, but some of them just sort of crackle up and fail to stick properly. I'm starting to suspect that has more to do with my iron than the transfer paper, though. Anyway, I'm printing out some transfers that I've scanned and altered in Photoshop so that they're basically clear apart from the text or diagram that I want to use. I think this lightens them both literally and metaphorically so the transfers don't tend to dominate the watercolor.

Tuesday, March 22, 2011

mauve-y? lavender?


More digital collages, 9x12".

I don't know what you call that color there but I'm completely fixated on it lately :) I used to never wear purple or lavender and now all of a sudden I love it. How does that happen?

Friday, February 25, 2011

snow and moss


Digital collages, 9x9".

These are from some pictures I took over the last couple days - one set of pics of snow falling at night, taken with a flash. That's what all the spotty spots are. The other pics were the next day in the snow of some mossy trees.


I took a kitty out in the snow to look around and this is what she did when I actually set her down in the snow. Those little toes all spread out with claws extended mean she was not too sure about all this :)

Monday, January 31, 2011

new collages


More photos, more scans, more textures. The colors on these digital pieces are all derived from the photos and scans instead of picking a color that's pretty like I usually do when I'm painting. I'm making the colors more or less saturated and replacing some with other colors from the same piece but it's all there to start with.

The non-photo bits here are from a gardening book of my grandma's. She had cut out articles in the paper with gardening advice and stuck them into the book, so I've used a little of both here. I think I'm gravitating toward the gardening themes again as we get closer to spring.

Saturday, January 22, 2011

more layers


Digital collages, 5x7".

Making these is a good excuse to try taking more random pictures and I'm liking my new camera. I haven't had a camera that had a manual focus option in several years so I'm taking a bunch of odd blurry and light-spot-y pictures to use as textures for these collages.

The auto-focus setting is great, too, though. It focuses so much faster than the old camera. I'm taking lots of cute kitty pictures because it will actually focus while the cat is still doing the cute thing! With my old camera, I got lots of pictures 3 seconds after the cat did something cute :P I don't think I (or anyone else) wants this to turn into a cat blog, so I'll try to restrain myself from posting all cat photos.

In believe-it-or-not news, the sun actually was out today.

Thursday, January 13, 2011

layering = best in winter


I haven't really been back in the studio since Boo got sick. Something about mustering the concentration I need to work is really hard when things are weird in some way.

This last week or so I've been feeling the itch again a little. Working digitally feels like an easier way to get started again because if it isn't working I can undo what I've done or just delete the file altogether.

So this is what I've been working on the past few days. I've got a better camera now so I thought it would be interesting to incorporate photos (instead of only scans) into digital collage. I'm taking pictures of random things that I wouldn't normally bother to photograph with the idea that they document my days and function as interesting textures in the collage. You probably can't see for sure what they are but I know they're there and what I was doing when I took the photo. So it's sort of like a diary process but less literal. It's interesting to me, anyway :)

The other thing I've been thinking about is how I feel a lot differently about the creativity/crafty pieces now. I liked them before, but I seriously think knitting and sewing and doing simple, repetitive things helped me get through this tough time. And the idea that making these kinds of things might have helped my grandmothers and the women in my family to cope with difficult periods in their lives, too. I've inherited a number of crocheted and embroidered items from both sides of my family and looking at these things makes me think about what else was going on at the time they were made. I'm not sure how these ideas will be reflected differently (if at all) in the drawings I'll make but it's added a whole new layer of meaning to them for me.

I hope that all made some sense...I love reading about other blog-friends' processes and inspirations so I wanted to let you know what's going on with these.

Thursday, July 8, 2010

Digital collages


So with this whiplash-inducing change in the weather I'm feeling hot and lazy. What better way to make art during a heat wave than to sit at the computer next to the lovely air conditioning vent? I made these out of scans from my train book and some sewing and knitting directions and diagrams. I notice that my colors suddenly got quite a bit brighter - partly because of the source scans and partly because of the weather, I guess.

Friday, April 16, 2010

Some digital collages today


I was in a digital mood, I guess. I scanned some things out of my lovely book I've been using lately and combined them with some scans out of an old magazine of my grandma's. She knitted me a toy rabbit when I was little and after she passed away I found the magazine she knitted it from, complete with handwritten notes to herself.

I like preserving this kind of thing so somebody else can see it. I have an old travel easel/paintbox of hers from...I don't know when. It's pretty old. My dad gave it to me and I kept it exactly as it was with all the old tubes of paint in it and it's on display in a cabinet. I would rather have things like that out where I can see them even though there's some sad memories there, too.

Thursday, September 3, 2009

Last one...for now.


This is the last of the group I was working on.  Today's diagram:  another cyme.  The paper texture is the same as before, just a different area of the sheet.  The original piece was only 6x8" or so but I scanned it kind of huge.

Wednesday, September 2, 2009

Panicle


Today's flower diagram is a panicle.  Panicle, panicle.  I think panicle is a great word and I like how it sounds.  

Tuesday, September 1, 2009

Digital collaging


Here's the next one.  The paper texture is from an old piece of paper that was in one of my grandmother's sketchbooks.  The flower head structure today is:  a cyme.  There will be a quiz.

Monday, August 31, 2009

Sudden whims


I had a random craving to play around in Photoshop today and I came up with a couple of little collages that I was happy with.  The diagrams are from an old gardening book and show a compound umbel and corymb (which I had never heard of before).  The background textures are a piece of wood and an old piece of fabric.  I did the repeats with a custom brush - my favorite thing to do.

Monday, April 27, 2009

How I scan and reassemble a drawing in Photoshop

I've been getting better at scanning my drawings and paintings that don't fit on my scanner bed in multiple scans and putting them back together in Photoshop.  As always, this is just how I do it and it works for me.
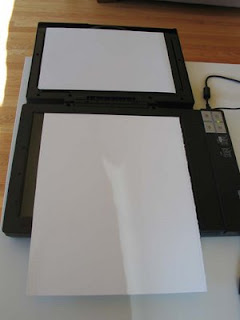
Yeah, this isn't going to scan in one go.  I line up the top of this drawing with one edge of the scan bed.  Notice the lid is completely turned over and flat.
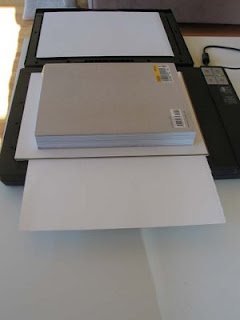
After trying a number of different things, I've decided that the lid to my scanner is too uneven to press down smoothly on the paper.  So I've been using a pad of tracing paper that exactly fits into the scanner bed.  Then I weight it with a book that's not too heavy - I don't want to mess up the scanner or put a permanent crease in the paper.  The top edge of the drawing is completely flat to the glass, but the part that's going off the edge of the scanner is not.  Since I'll overlap the two scans later, it doesn't matter that part of it is curved.

The weight of the paper or board is pretty important at this step.  This drawing is on a nice heavy Stonehenge paper that's sturdy enough to straighten back out after it's bent slightly on the scanner, but not so heavy that it refuses to bend at all.  If it's so rigid that it won't bend so you can at least get one corner flat on the scanner, you'd probably have to set up lights and photograph it instead.
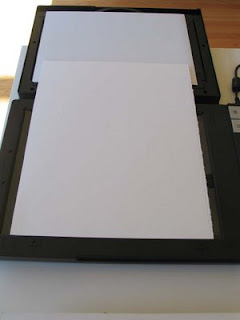
Here I've removed the weight and slid - not rotated! - the paper to scan the bottom half.  Putting the lid flat allows you to slide the paper straight across to do the next scan.  I've tried rotating the paper to scan the different sides and something always ends up looking wrong - the color shifts, the scanner's lights cast a different shadow so the texture looks different, etc.  So to make the next steps simple, I keep the paper facing the same direction.
I put the weights back on, and scan.
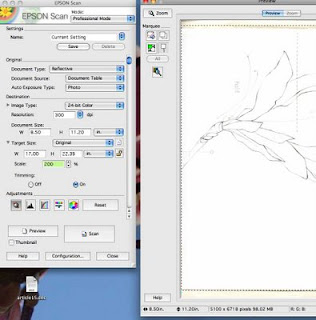

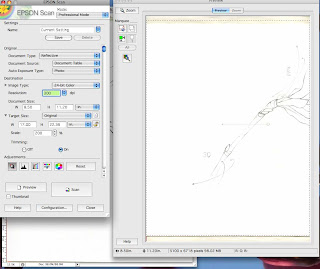
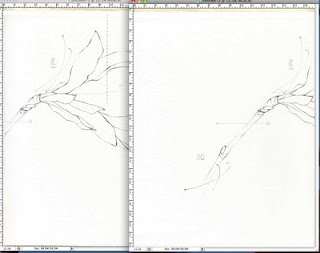
Here's the two scans.
Now for the Photoshopping.  I have two images that have some overlap in the middle - some of the middle of the drawing is in both scans.
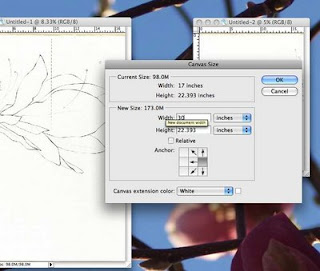
I save the images so I don't have to rescan them if something goes wrong, then I pick one to work from and extend one side of the image by clicking Image-->Canvas Size which gives me this little box.  I type in a new width for the image (roughly double the existing size) and click on the little square to show which side the current image will stay on.  If you leave it in the middle, it will give you extra space all the way around the current image and in this case you only need one side to be bigger.  
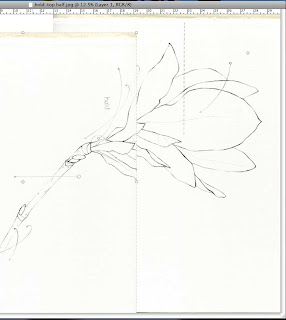
Now I have the Move tool selected and I click and drag the smaller image onto the one I've extended.

Side note: the option up at the top in the toolbar to "Show Transform Controls" with this tool is super convenient.  You don't have to go through the menu to transform/rotate the current layer.  Just watch the arrows as you mouse over the edges of the image or you accidentally rotate when you're just trying to move.  To resize, pick a corner and hold the Shift key to keep the layer in proportion, then double click on the image or click the checkmark button that shows up in the toolbar.  To cancel, click the circle-with-a-slash button.  I swear it sounds more complicated than it is :)

Change the layer opacity of the top layer so you can see when it's lining up.
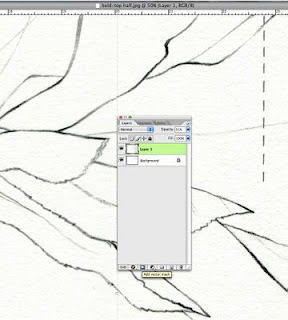
Move it onto the bottom layer until it's lined up as close as you can get it.  Sometimes it helps to rotate the top layer to get it to line up better, but I find it to be tricky.  Don't worry about whether the whole thing is aligned - just get the area where the two layers overlap pretty close.

Now click the little button at the bottom of the Layers palette that says "Add layer mask."  This is how I blend one layer into the other so you can't tell that I had to fake it with two scans.  Once you have a layer mask, select the Brush tool.  The foreground and background colors are set to black and white.  Choose a large, soft-edged brush (you might have to run the little slider from the Brush Preset option in the toolbar to get one big enough) and click the "swap back-and-forth" arrow next to the foreground/background colors (or press x, at least on my Mac).  Once you have white selected as the foreground color, you can start painting.  But you're not painting, you're just choosing to stop showing some of the layer.  It's like using the Erase tool without ever losing any of the original layer.  You can "paint" some of the layer away on the Layer Mask, then switch to the opposite color and "paint" it back in.  That back-and-forth is really important on my drawings, because there will be parts that I want to show from the top layer and parts that I want to be visible from the bottom layer.
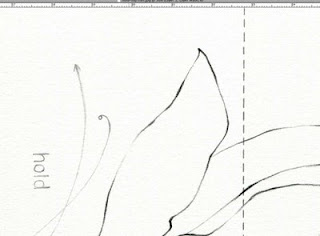
Here's what this area looks like when it's finished.
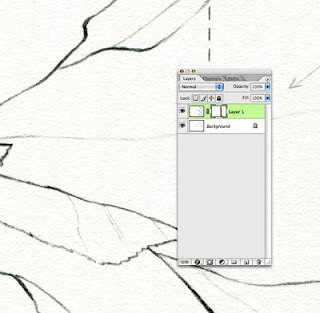
This shows where I've "painted" on the layer mask - if you can't see it, click to enlarge.  The main thing is not to just paint a straight line on the layer mask - if you break it up and weave around a little bit, your eye is much less likely to catch the transition.

As with anything, the layer mask sounds weird and complicated but you'll see how it works if you try it.  It's great for making any part of a layer transparent without losing any of the original layer - you can either put it back in or just delete the layer mask.

That was a long how-to for something that doesn't take that long to do...isn't that always the case :)

Thursday, March 19, 2009

Mini-prints


Well, they're mini to me anyway - 5x7".  I was drawing the seeds I started this spring in the window of my studio as they came up and I thought I should make something out of them.  These are digital prints from the pencil drawings with color added and custom brushes for the backgrounds.  I'll probably do more of these as more seeds sprout because it seems appropriate to make them in quantity, just like the seedlings themselves are all coming up in a big group.


Wednesday, February 25, 2009

Photoshop mini-demo

Ok, I know there's a lot of ways to do things in Photoshop, so this happens to be the way that I do things.  It may not be the best way or the fastest way, but it makes sense to me.  Here it is:

Separating a pencil drawing from the background

Combining multiple drawings in a piece is one of my favorite things to do.  Usually, I want to separate out the pencil lines so that I have more options in layering them together.
This is (part of) my drawing as it was scanned in.  I like to sketch the drawing in my sketchbook, then trace it onto tracing paper so I don't have to mess with all the erased lines and things from the original.  That way I can get the kind of line quality I'm looking for since trying to correct a messy sketch digitally often seems to lose some of the texture.
Levels again, just like in my last how-to, but with a screenshot this time.  Access this menu from Image-->Adjustments-->Levels.
Here I've moved that little white triangle slider to the left a bit.  With "Preview" checked, you can see the paper texture has disappeared.
Rotated the image since it wasn't upright when I scanned it.
Now we're going to pick out the drawing from the white background.  Go to Select-->Color Range to open the menu below.
Use the little color picker tool it gives you to select the white--not the pencil lines.  Trying to select every variation of gray in the pencil lines doesn't really work, but if you've made a completely white background, selecting all of it is easy.
But you really want the pencil lines, not the space around them, so click Select-->Inverse to select the opposite of what you have currently selected.
You can grab the drawing with the move tool and move it over to the document you're working on, but I like to just make a new layer.
Then I grab the layer out of the layers palette and drag it onto the document I'm working on.
Make sure you have the layers palette visible, of course.
I never really use a pencil drawing in its actual colors in my work.  To change the color super quick and easy, I just click that little grid button next to the word "Lock" on the layers palette.  As you can see, if you hover your mouse over it, it says "Lock transparent pixels."  That means that because your drawing lines are not transparent but the rest of the layer is transparent, you can protect the transparent parts.  Does that make sense?  If not, just keep reading.
There's the button clicked.
So because you've locked those transparent pixels, you can go to Edit-->Fill to fill the un-transparent parts of the layer.  Of course, make sure you've clicked on the layer the drawing is on.
I've already chosen the color I want to use which is in the front of my two selectable colors in the toolbar--hence Foreground Color as opposed to Background Color, or you can choose a color straight from here.  Just click the little arrows next to Foreground Color to see your other options.
Once the drawing is blue, I clicked the "Background" layer to fill it with a different color so you can see how the drawing layer is really only the lines themselves and is otherwise transparent.

I've written this entire how-to with the laziest cat in the world on my lap, so I'm hoping it all makes sense.  It's very distracting when he's having a dream :)