Wednesday, February 25, 2009

Photoshop mini-demo

Ok, I know there's a lot of ways to do things in Photoshop, so this happens to be the way that I do things.  It may not be the best way or the fastest way, but it makes sense to me.  Here it is:

Separating a pencil drawing from the background

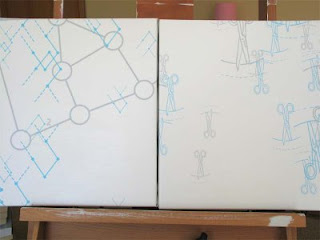
Combining multiple drawings in a piece is one of my favorite things to do.  Usually, I want to separate out the pencil lines so that I have more options in layering them together.
This is (part of) my drawing as it was scanned in.  I like to sketch the drawing in my sketchbook, then trace it onto tracing paper so I don't have to mess with all the erased lines and things from the original.  That way I can get the kind of line quality I'm looking for since trying to correct a messy sketch digitally often seems to lose some of the texture.
Levels again, just like in my last how-to, but with a screenshot this time.  Access this menu from Image-->Adjustments-->Levels.
Here I've moved that little white triangle slider to the left a bit.  With "Preview" checked, you can see the paper texture has disappeared.
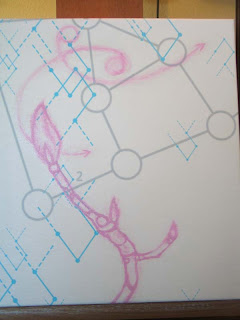
Rotated the image since it wasn't upright when I scanned it.
Now we're going to pick out the drawing from the white background.  Go to Select-->Color Range to open the menu below.
Use the little color picker tool it gives you to select the white--not the pencil lines.  Trying to select every variation of gray in the pencil lines doesn't really work, but if you've made a completely white background, selecting all of it is easy.
But you really want the pencil lines, not the space around them, so click Select-->Inverse to select the opposite of what you have currently selected.
You can grab the drawing with the move tool and move it over to the document you're working on, but I like to just make a new layer.
Then I grab the layer out of the layers palette and drag it onto the document I'm working on.
Make sure you have the layers palette visible, of course.
I never really use a pencil drawing in its actual colors in my work.  To change the color super quick and easy, I just click that little grid button next to the word "Lock" on the layers palette.  As you can see, if you hover your mouse over it, it says "Lock transparent pixels."  That means that because your drawing lines are not transparent but the rest of the layer is transparent, you can protect the transparent parts.  Does that make sense?  If not, just keep reading.
There's the button clicked.
So because you've locked those transparent pixels, you can go to Edit-->Fill to fill the un-transparent parts of the layer.  Of course, make sure you've clicked on the layer the drawing is on.
I've already chosen the color I want to use which is in the front of my two selectable colors in the toolbar--hence Foreground Color as opposed to Background Color, or you can choose a color straight from here.  Just click the little arrows next to Foreground Color to see your other options.
Once the drawing is blue, I clicked the "Background" layer to fill it with a different color so you can see how the drawing layer is really only the lines themselves and is otherwise transparent.

I've written this entire how-to with the laziest cat in the world on my lap, so I'm hoping it all makes sense.  It's very distracting when he's having a dream :)

Tuesday, February 24, 2009

Paintings and collage


This is the start of the second canvas.  I'm kind of just messing about with these because I'm not really sure what I want to do with them.  It makes sense to find a local coffee shop or boutique to hang canvases since a) I don't need to frame them to hang them and b) they're more expensive than prints and therefore more difficult to sell online.  Besides the fact that stretched canvases would be sort of tricky to ship safely.  

This is a digital collage I made to put into a frame that I was bored with and spray painted an electric blue.  I wanted something that could compete with the frame--hence the pink and orange.  I kind of like how it turned out, though, so I'm thinking of adding it to my shop.


That's all for now...I'll add another Photoshop how-to soon with a couple of my little tricks I used making this.
   

Sunday, February 22, 2009

Oil painting in progress


I stretched my canvas prints onto some stretcher bars and got on with some painting.  Here's two of the prints (I'll have to get some more stretcher bars to stretch the third).

Here's the start of the first painting.  I set up a tripod and took some video (right here) although I don't think my talents lie in the video realm.  I hope it might be either useful or sort of interesting...at least I've learned some things making it :)


These pictures show the details a little more clearly.  

I know that there's an infinite number of ways to paint, blend colors, and use your brushes, so I find it interesting to see how other people paint.  I have done the monochrome-underpainting-and-glazing-color thing, the create-3D-objects thing, the hide-your-brushstrokes thing, but now I'm into line drawings and color and lots of interesting brushstrokes, so this is how I do it.  My friend in my painting classes last year realized that all I'm doing with paint is what the Smudge tool in Photoshop does.

Some other random info:  
-I mix in a little Graham walnut alkyd medium to dry the paint relatively quickly--usually by the next day.  It's the only alkyd medium I use now since at the ripe old age of 28, I've gotten too sensitive to the nasty petroleum-chemical smells of other alkyd mediums.

-I use hog bristle brushes and scrub them until they turn into little blunt-ended stumps.  It's lucky they're so cheap (compared to say, watercolor brushes) because I'm pretty hard on them.

-This canvas is Epson water-resistant canvas, with a layer of acrylic matte medium brushed on to seal the ink in.

-I'm using transparent blender from Daniel Smith.  Normally, I use two colors (or more) but in this case, I want the print underneath to show through.

Wednesday, February 18, 2009

Canvas prints


I'm finally kind of functional again and getting over a cold, so I'm starting a new project.  These are canvas printed by my new (to me) printer that I found last month on Craigslist.  I'm going to paint with oils over the top and see what happens.  I tried this a little last summer at school, but the school printer was 44" wide, not 17" wide.  But hey, I didn't have to sell my car to buy it, so that's nice.

I like printing out these diagrams so that I can have a lot of repeated identical forms without actually having to paint each one in.  To make the images, I used different custom brushes in Photoshop and I love them so much I want to make sure everyone knows how to make them.  So I present:


Custom brushes in Photoshop
Here's my image as scanned.  It's from one of my sweetheart's old college textbooks...I just tore out the pages I wanted and scanned them.  

I cropped out the bits I didn't want using the crop tool in the toolbar.
I adjusted the levels (Image-->Adjustments-->Levels) to get rid of the text showing through from the other side.  Levels are a really easy way to take out the paper texture or color from scanned images.  To make a white background, as here, I slide the farthest over slider on the right (a little white triangle) towards the left until the whites are actually white.  Make sure the "Preview" box is checked...and it's easy to check if you like your changes by checking and unchecking the box a couple times to see the original.

I used the brush tool with white selected for the color to just blot out those letters that I didn't want.

Now for the exciting bit:  go to Edit-->Define Brush Preset.  If it's grayed out, make your image a bit smaller with Image-->Image Size.  In CS2, the longest side of your image can only be up to 2500 pixels wide.  You can give it a name if you like.

The brush will appear when you click on the brush tool and select it from the list up in the top toolbar (newest brushes at the bottom, so scroll down to it).  Pick a color you like and a new image/document to work on.  To use the brush, just move your mouse to where you want it and click.  You'll see the outline of the brush as you move, so it's really easy to see exactly what it will look like.  You can also change the size of the brush with the Master Diameter slider.  

That's it!  I use my custom brushes all the time.  It saves a ton of time versus just adding the same image 20 times in new layers.  

Ok, I hope that all made sense.  This is a learning process for me, too.


Friday, February 13, 2009

Resolutions

Reading the discussion over at decor8 about taking action toward your goals has made me realize that I might have a little bit of knowledge that could be useful to other people.  Being in school until recently made it easy to help people out in, say, digital art classes when they were having some issue in Photoshop.  But the ol' WWW can spread that know-how around in a much more efficient way.  

I know that there are much better sewers, gardeners, artists, and tutorial writers out there, but what if I just add things in occasionally in a simple, project-based way?  I know that helps me out when I'm trying to learn something new.  I never remember how to do something unless I've needed to do it for a certain project.  You can tell me 84 times how to make a clipping mask in PS but until I've wanted that particular result, it doesn't mean anything to me.

Anyway, I think I would enjoy at least documenting my projects in a more organized, start-to-finish way for my own benefit, so I'll try it and see how it goes.

Tuesday, February 10, 2009

Moss and lichens


I've been admiring how mossy, fern-y, and lichen-y (those are totally real words) everything is on this side of the state.  The trees are all bare right now but they have enough mosses and things growing on them that they still look dressed up.  These mosses are growing on a massive old stump behind our house.  It has a small tree growing out the top, some sort of shrub, ferns, and all these tiny things growing on it.  Back where it's dry, a stump mostly just looks like a stump, not a miniature forest.

Monday, February 9, 2009

Ok, that's enough pixels for right now.


I was on a digital binge for the last several days.  I kept getting ideas that I wanted to try..."I'll scan this thing here, then I can make that" and so forth.  Something about working at my computer too much makes me want to pull out some brushes and paint and use my hands, so I think this is the end of the digital and drawn pieces for the moment.

Dotted lines (or are these dashed lines?) are so interesting.  They can instruct (cut here) or show the hidden part of something in a diagram.  Or they show where to draw the top of the lowercase letters when you're learning how to write.  And they remind me of hand sewing, too.  What more can you want from a line?

Friday, February 6, 2009

Roses again


Another new piece...drawn, scanned, colored, collaged, etc.  

I tend to start drawing in my sketchbook without thinking too much about why I'm drawn to a particular subject or image.  Once I'm going back through my recent sketches for something to work from, I give a little more thought to what it is that caught my attention.  For example, the subject of gardening in general is really interesting to me right now--planting and transplanting, pruning away something to make a stronger plant or a better flower.  I feel like moving away from where I grew up is making all these things resonate for me at the moment.

As far as why I want to draw and work with roses the past few weeks, I think that's more specifically about leaving my roses in the old garden.  I'll start a new rose garden here and I'm starting to look for places I can buy the roses I planted before.  It's still sad to leave them there, of course.

Side note:  I prefer to grow old-fashioned or old-fashioned looking roses.  However, I think the modern shaped roses read better as line drawings, as here.


Monday, February 2, 2009

Goodbye to the garden


When we went back to the old house this weekend to pick up the last of our stuff, this is what it looked like outside.  I think it might make it easier to say goodbye to a garden when it's under a foot of solid ice than if it were in mid-June bloom.  This winter has been completely horrible--you can see a where some of the tree branches broke off from all the snow.


I realized after writing about how much I like white translucent frosted surfaces to draw and paint on that the new light I installed above the dining table is, well, you know.  I wired this myself and I think my first electrical project turned out quite well.